I recently bought two Powersoft K10 AESOP amps the idea being that one will power left and right house tops and the other house subs. Fine as these amps are they present some packaging challenges: they are relatively deep; the CPC power connector sticks out about 3 inches, even with a right-angle backshell; the Ethernet/AESOP RJ-45 jacks are PC mount types, not Ethercons; and if you want routinely to use the XLR and Speakon connectors on the back you need thumb clearance to unlatch them.
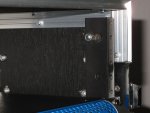
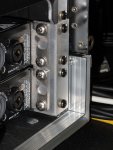
Not wanting to get involved in getting a custom rack case fabricated I scoured the Internet for off-the-shelf solutions. I settled on EWI Roadcase's deepest 4 RU rack case. This is strong enough for my relatively mild needs. The trouble is that the spacing between the front and rear rack rails causes the rear mounting holes on the amps to fall exactly on the rear rack rails. The solution was to move the front rails forward about 1/2 inch by drilling new holes in the rails for the bolts that secure the rails to the case. There is just enough material to do this. It places the amp's rear holes just inside the rear rail so that a piece of 1 x 1 x .125 Al angle makes a very solid rear bracket. Moving the amps forward also provides more room for the power connector. The Powersofts only need 1 inch in front of the front rails, so no problem there.
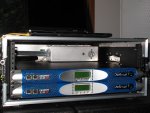
The thumb clearance required for the input and output connectors absolutely prevents an amp from occupying the top space in the rack. (You'd need a special tool to unlatch the Speakons.) Since I need two contiguous spaces to accommodate the diameter of an L14-30 power inlet the only possibility is to put the amps together at the bottom of the rack and the power adapter panel at the top.

The cutout in the power panel provides ample thumb clearance. The panel also holds an Ethercon feed-through so that a rugged, strain-relieved network cable can be used. An aluminum enclosure contains the power wiring and and a 15 A branch rated circuit breaker and convenience outlet on its front side. The Ethercon is outside the power enclosure. A diagonal brace from the right edge of the panel to the enclosure stiffens the panel, which is fabricated from .125 6061-T6, against torment by heavy power cords.
Here are some part number:
CPC connector body TE Connectivity 206037-2
CPC rt-angle backshell TE Connectivity 1546349-2
CPC contacts TE Connectivity 2-66741-1
Ethercon feed-through Neutrik NE8FDP
5x10x3 enclosure Bud AC-404
rt-angle cord-grips McMaster 7466K533
15 A CB McMaster 3851K11
--Frank
Not wanting to get involved in getting a custom rack case fabricated I scoured the Internet for off-the-shelf solutions. I settled on EWI Roadcase's deepest 4 RU rack case. This is strong enough for my relatively mild needs. The trouble is that the spacing between the front and rear rack rails causes the rear mounting holes on the amps to fall exactly on the rear rack rails. The solution was to move the front rails forward about 1/2 inch by drilling new holes in the rails for the bolts that secure the rails to the case. There is just enough material to do this. It places the amp's rear holes just inside the rear rail so that a piece of 1 x 1 x .125 Al angle makes a very solid rear bracket. Moving the amps forward also provides more room for the power connector. The Powersofts only need 1 inch in front of the front rails, so no problem there.
The thumb clearance required for the input and output connectors absolutely prevents an amp from occupying the top space in the rack. (You'd need a special tool to unlatch the Speakons.) Since I need two contiguous spaces to accommodate the diameter of an L14-30 power inlet the only possibility is to put the amps together at the bottom of the rack and the power adapter panel at the top.

The cutout in the power panel provides ample thumb clearance. The panel also holds an Ethercon feed-through so that a rugged, strain-relieved network cable can be used. An aluminum enclosure contains the power wiring and and a 15 A branch rated circuit breaker and convenience outlet on its front side. The Ethercon is outside the power enclosure. A diagonal brace from the right edge of the panel to the enclosure stiffens the panel, which is fabricated from .125 6061-T6, against torment by heavy power cords.
Here are some part number:
CPC connector body TE Connectivity 206037-2
CPC rt-angle backshell TE Connectivity 1546349-2
CPC contacts TE Connectivity 2-66741-1
Ethercon feed-through Neutrik NE8FDP
5x10x3 enclosure Bud AC-404
rt-angle cord-grips McMaster 7466K533
15 A CB McMaster 3851K11
--Frank


