
I am assembling a new video playback rig and it is my first one that isn't rack mounted so I am looking for a case. The case will need to hold a Shuttle PC, a 20'' widescreen monitor, a TripleHead2Go, a small wireless router, an additional external hard drive, a trackball mouse, a small keyboard, a power strip and a few misc wall-wart type power supplies and cables. I am guessing a Pelican with the pick-n-pluck foam is going to make the most sense but I'm not actually sure how big it will need to be or if there are other, better, options. Most of my other stuff is in various ATA type cases (stock cases from EWI and custom ones from Anvil, R&R, etc) although I do have a Pelican 1660 for my DM1000 and a smaller one (I forget the number) for my headphones and other personal items. Anyway, thought?
Case for Computer
- Thread starter Matthew Haber
- Start date
You are using an out of date browser. It may not display this or other websites correctly.
You should upgrade or use an alternative browser.
You should upgrade or use an alternative browser.
Re: Case for Computer
While not quite the equipment or setup like yours, this is what I arranged for my audio laptop stuff.
This system is used for general music and show playback, monitoring and control of LS9 and Drive Rack, and also audio measurements.
The case is by SKB (don't remember the model No.). The trays and foam work is mine.
All exposed:
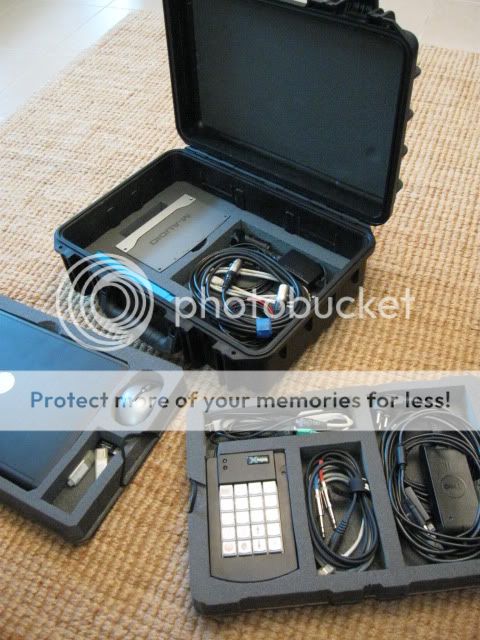
Mid tray in place:
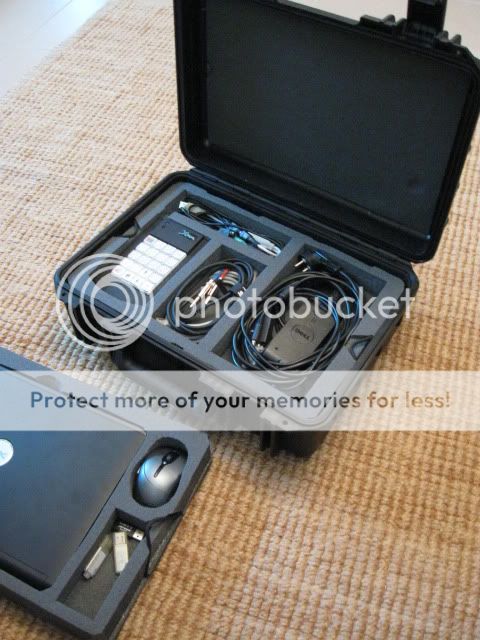
Top tray in place:
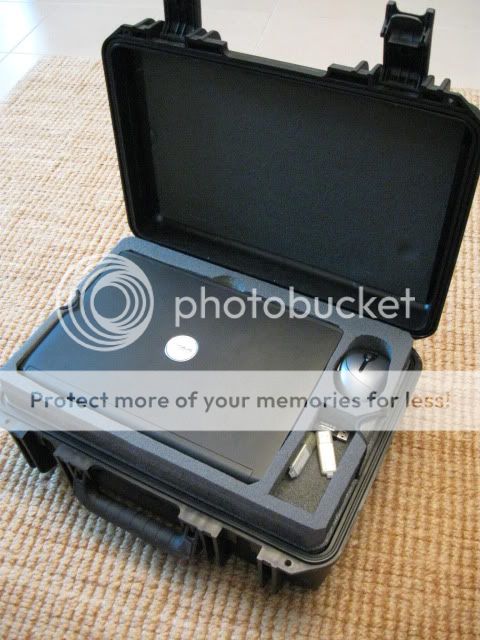
Case closed
 :
:


While not quite the equipment or setup like yours, this is what I arranged for my audio laptop stuff.
This system is used for general music and show playback, monitoring and control of LS9 and Drive Rack, and also audio measurements.
The case is by SKB (don't remember the model No.). The trays and foam work is mine.
All exposed:
Mid tray in place:
Top tray in place:
Case closed
Re: Case for Computer
What size Shuttle? If it's the standard breadbox-sized unit, you're going to be looking at a reasonably large case, especially with the 20'' monitor. The Pelican stuff is relatively lightweight, and very reasonably priced, but can get unwieldy in the larger sizes.
What size Shuttle? If it's the standard breadbox-sized unit, you're going to be looking at a reasonably large case, especially with the 20'' monitor. The Pelican stuff is relatively lightweight, and very reasonably priced, but can get unwieldy in the larger sizes.
Re: Case for Computer
Nice setup dude
 I have basically the same setup for my portable recording rig
MacBook Pro
MHLabs ULN8
Peace
[edit: removed images from quote -BCP]
While not quite the equipment or setup like yours, this is what I arranged for my audio laptop stuff.
This system is used for general music and show playback, monitoring and control of LS9 and Drive Rack, and also audio measurements.
The case is by SKB (don't remember the model No.). The trays and foam work is mine.
Nice setup dude
MacBook Pro
MHLabs ULN8
Peace
[edit: removed images from quote -BCP]
Re: Case for Computer
It is the standard bread box size Shuttle. My DM1000 is in a Pelican 1660 which is pretty huge so I definitely get that this might get a little unwieldy although I am hoping that I can get this rig crammed in a smaller case than that.
Nimrod, did you do the foam work yourself? If so, how and if not, who did it for you. That looks really nice.
Robert "VOiD" Caprio
Sophomore
Re: Case for Computer
I wanna know too. Looks great.
Nimrod, did you do the foam work yourself? If so, how and if not, who did it for you. That looks really nice.
I wanna know too. Looks great.
Re: Case for Computer
He either does it or has someone close that does custom cutting. The foam packing my BT's came in were cut razor sharp.
He either does it or has someone close that does custom cutting. The foam packing my BT's came in were cut razor sharp.
Re: Case for Computer
Just based off of the 9x9x12 dimensions of the Shuttle boxes, and the 20x18xsomething of a 20'' widescreen, I doubt you'll fit that rig into a case smaller than a Pelican 1660. Have you considered downsizing any of the components, or going to a custom case?
It is the standard bread box size Shuttle. My DM1000 is in a Pelican 1660 which is pretty huge so I definitely get that this might get a little unwieldy although I am hoping that I can get this rig crammed in a smaller case than that.
Nimrod, did you do the foam work yourself? If so, how and if not, who did it for you. That looks really nice.
Just based off of the 9x9x12 dimensions of the Shuttle boxes, and the 20x18xsomething of a 20'' widescreen, I doubt you'll fit that rig into a case smaller than a Pelican 1660. Have you considered downsizing any of the components, or going to a custom case?
Re: Case for Computer
I'm starting to think that it might make more sense to leave the monitor out of this case. I already have a bunch of individually cased 15'', 17'', and 20'' monitors and I could always just grab one of those when I send out the computer rig instead of including a monitor in the same case. I also suspect that skipping the monitor will let me fit this in a much smaller case than I could with it included.
I have considered going with a completely custom case and it is still a possibility but it would be pretty expensive to go this route and I like that with a Pelican I can pretty easily change the foam down the road so the case won't become useless once I change what computer I am using.
Just based off of the 9x9x12 dimensions of the Shuttle boxes, and the 20x18xsomething of a 20'' widescreen, I doubt you'll fit that rig into a case smaller than a Pelican 1660. Have you considered downsizing any of the components, or going to a custom case?
I'm starting to think that it might make more sense to leave the monitor out of this case. I already have a bunch of individually cased 15'', 17'', and 20'' monitors and I could always just grab one of those when I send out the computer rig instead of including a monitor in the same case. I also suspect that skipping the monitor will let me fit this in a much smaller case than I could with it included.
I have considered going with a completely custom case and it is still a possibility but it would be pretty expensive to go this route and I like that with a Pelican I can pretty easily change the foam down the road so the case won't become useless once I change what computer I am using.
Re: Case for Computer
Thanks

Yes, I did it myself. Of course a CNC router job would be the ultimate way,
but unless someone has this capability in house, a one-of would cost a considerable bit.
First stage was deciding and designing the layout of the equipment. The main consideration
was ease and order of access that would be according to each item's frequency of use.
For my uses I don't need all of the equipment every time. So naturally the laptop and its
necessary peripherals went on the top tray, Its PSU directly underneath and so on.
Another consideration was the pack thickness of the different items. Identical (or close) thickness items
that share the same tray, makes it much easier when preparing the packing cutouts.
So, I had everything thought out, including adequate foam layers on the top and bottom of the case,
as well as on each tray/divider.
I used 8mm foam for the top and bottom of the case (these were stuck directly to the case).
The trays were made of 4mm birch plywood shaped to match the inner contour of the case
at the appropriate heights, and sandwiched by 5mm foam on both sides.
The 3M Super77 contact glue was used for all the gluing throughout this project.
For the packing layer I used 40mm foam, cut to the outer size of the tray boards,
and cut out according to the various items outlines with a sharp long blade utility knife.
The key here is maintaining a super sharp blade and a steady hand...doing multiple passes
alongside a straight edge or ruler, until the full thickness is cut.
These cut out packing blocks were then laid on the tray board and the glue area marked.
Next, mild masking tape (that would not pull the foam when later removed) was applied
to the areas to be left unglued, and the mating surfaces sprayed with the Super77.
The masking tape was immediately removed, and (after a few minutes) the cut out block was
carefully aligned and attached to the board.
Additional trimming was done with the utility knife and a 4'' angled grinder with a fresh cutting disk
(carefully, as it eats the foam like it's not there...but results in a nice finish)
")
Nimrod, did you do the foam work yourself? If so, how and if not, who did it for you. That looks really nice.
Thanks
Yes, I did it myself. Of course a CNC router job would be the ultimate way,
but unless someone has this capability in house, a one-of would cost a considerable bit.
First stage was deciding and designing the layout of the equipment. The main consideration
was ease and order of access that would be according to each item's frequency of use.
For my uses I don't need all of the equipment every time. So naturally the laptop and its
necessary peripherals went on the top tray, Its PSU directly underneath and so on.
Another consideration was the pack thickness of the different items. Identical (or close) thickness items
that share the same tray, makes it much easier when preparing the packing cutouts.
So, I had everything thought out, including adequate foam layers on the top and bottom of the case,
as well as on each tray/divider.
I used 8mm foam for the top and bottom of the case (these were stuck directly to the case).
The trays were made of 4mm birch plywood shaped to match the inner contour of the case
at the appropriate heights, and sandwiched by 5mm foam on both sides.
The 3M Super77 contact glue was used for all the gluing throughout this project.
For the packing layer I used 40mm foam, cut to the outer size of the tray boards,
and cut out according to the various items outlines with a sharp long blade utility knife.
The key here is maintaining a super sharp blade and a steady hand...doing multiple passes
alongside a straight edge or ruler, until the full thickness is cut.
These cut out packing blocks were then laid on the tray board and the glue area marked.
Next, mild masking tape (that would not pull the foam when later removed) was applied
to the areas to be left unglued, and the mating surfaces sprayed with the Super77.
The masking tape was immediately removed, and (after a few minutes) the cut out block was
carefully aligned and attached to the board.
Additional trimming was done with the utility knife and a 4'' angled grinder with a fresh cutting disk
(carefully, as it eats the foam like it's not there...but results in a nice finish)
Re: Case for Computer
Wow, Nimrod. Color me impressed. That is extremely professional looking for a DIY job. Also seems like lot of labor (and patience I don't have) so I wonder how much is would cost to have someone do this sort of work for me.
Wow, Nimrod. Color me impressed. That is extremely professional looking for a DIY job. Also seems like lot of labor (and patience I don't have) so I wonder how much is would cost to have someone do this sort of work for me.