New DIY Mid High (90deg) - AKA PM90
- Thread starter Peter Morris
- Start date
You are using an out of date browser. It may not display this or other websites correctly.
You should upgrade or use an alternative browser.
You should upgrade or use an alternative browser.
Peter, thanks for the great design. Mine are getting shape (slightly changed design). Can't wait to finish them and get some sound out of them ;-)
Hey Peter,
What changes did you make?
In my version the 12"s are mounted on a flat panel with a slightly increased horn length (should give a bit more low: to be proven in measurements soon... ") ). This flat panel simplifies the built a little bit. It also increases the height of the cabinet a few cm and that is ok, because I want to be able to put this cabinet on its front on a double 18" sub with the same height during transport.
). This flat panel simplifies the built a little bit. It also increases the height of the cabinet a few cm and that is ok, because I want to be able to put this cabinet on its front on a double 18" sub with the same height during transport.
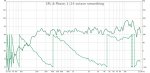
). This flat panel simplifies the built a little bit. It also increases the height of the cabinet a few cm and that is ok, because I want to be able to put this cabinet on its front on a double 18" sub with the same height during transport.After some tweaking I got the response as depicted below. This was measured using REW in a room, so full of reflections. I had to apply IR windows which affect the low freq data somewhat. Quite happy with the phase response now (note: with IIR non-lineair phase filters, DCX2496). Settings:
MID: 100 Hz BES12 HP, EQ -4dB Q=2 352Hz and 676 Hz BES24 LP.
HF: 676 Hz BES24 HP, EQ -4dB Q=2 3.5kHz and 6.5 kHz LR12 LP (BMS passive C8-8 filter)
VHF: 6.5kHz LR12 HP, inverted (BMS passive C8-8 filter).
So, you would expect 90+360+180 degrees phase shift due to the filters. At 100 Hz there is an additional 90 degrees phase shift due to the BR ports. So, this is about the best phase response you can get out of the DIY with IIR, I think. (I don't want to take the risk of damaging the BMS by going to a 12dB/oct x-over instead of 24dB/oct...)
For further EQ tweaking I will need to get the set in open air (or a very large room).

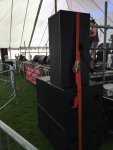
Hi I am making progress on the CAD version of the 90 degree box. The two prototypes have already been out on festival duty and have performed brilliantly. The next step is putting the CAD prototype together which is proving to be quite a task. I have gone for a laminate curve for the horn flare instead of cutting a few different angles. Also decided to use high density foam for the curves to try and cut down on weight. I will be testing the curved flare at our friendly university anechoic chamber when I have fitted the drivers. The original prototypes are processed with Lake LM26 and we managed to get the FR nice and flat from about 80Hz up to 16000 or there about plus or minus 2dB. Initial thoughts live were that the sound is very clean with small changes to system eq being instantly noticeable. Running them with 4, 18 inch subs a side we were registering high SPL,s at front of stage 112dB with average levels at FOH of between 95/105 I will post results as soon as I have some. I did E-Mail Peter about two weeks ago with a progress report have not heard back as of yet but my mail may have been trashed.


Attachments
The workmanship looks fantastic. Can't wait to see the testing results.
Hi I am making progress on the CAD version of the 90 degree box. The two prototypes have already been out on festival duty and have performed brilliantly. The next step is putting the CAD prototype together which is proving to be quite a task. I have gone for a laminate curve for the horn flare instead of cutting a few different angles. Also decided to use high density foam for the curves to try and cut down on weight. I will be testing the curved flare at our friendly university anechoic chamber when I have fitted the drivers. The original prototypes are processed with Lake LM26 and we managed to get the FR nice and flat from about 80Hz up to 16000 or there about plus or minus 2dB. Initial thoughts live were that the sound is very clean with small changes to system eq being instantly noticeable. Running them with 4, 18 inch subs a side we were registering high SPL,s at front of stage 112dB with average levels at FOH of between 95/105 I will post results as soon as I have some. I did E-Mail Peter about two weeks ago with a progress report have not heard back as of yet but my mail may have been trashed.
Hi Paul,
Sorry for not responding – had some internet / virus issues with my internet provider and lost a bunch of emails.
Anyway that looks great – I actually contemplated doing exactly what you have done with the laminated horn flare but I didn’t have the patience.
It looks like you are putting some fly track on the top - – you may be planning to do this, but I would connect the top of the box to the side walls with a metallic bracket and some bolts so even if all the wooden joints fail it all more all less still hangs together – FWIW I used some aluminium angle.
BTW - how are every bodies boxes performing now you had had a chance to do a few shows on them ?
Hi Paul, let me join in the workmanship compliments....all you guys are crankin out great look boxes.
When you get a chance, would describe how you made the curved horn section with laminates? And the rigid foam corners?
I see you used what looks like a liner of thin sheet of plywood, inside the box exterior....wondering why ?
Thx, Mark
When you get a chance, would describe how you made the curved horn section with laminates? And the rigid foam corners?
I see you used what looks like a liner of thin sheet of plywood, inside the box exterior....wondering why ?
Thx, Mark
BTW - how are every bodies boxes performing now you had had a chance to do a few shows on them ?
Hi Peter,
They are GREAT! Did a first gig with the DIYs with a band this weekend. My findings:
- The sound is flat, while the HF is crisp (but not too much).
- I had only one double 15" BR sub per side (small gig) and the low mid gain was 9dB lower than the subs (using the same amplification as with my old/previous tops). The BMS ran at -17dB... So, I have at least 9dB more headroom with the same amps.
- When mixing, these tops seem more "sensitive": 1 to 2 dB increase is sufficient to lift an instrument above/in the mix. Previously, I seemed to need 3-4 dB to do that.
- It is very easy to put voices and/or piano 'on top' of a mix and it sounds great.
- I heard things I didn't hear before during break music...
- Horizontal and vertical dispersion is very good: almost no coloration of the sound when walking through the venue. This saved me a lot of walks to 'calibrate' my ears (FOH was at the side, not in the middle of the venue).
- Sound is good at high SPL as well. Not like other 12" designs I know with x-over frequency >1kHz (SA C24, VRX932, ...)
- I forgot to check gain before feedback... I simply did not touch limit. I had 4 vocal mics on front and 1 vocalist with a soft voice. Not one beep nor near beep. I have the idea it could go a lot louder without any issue.
- I got compliments on the sound from both musicians and the crowd. Only after this I told them the tops are new and DIY...
- I still have to design new subs (I want a similar compromise as the tops: compact, quality sound and loud), but I already practiced the way to get the tops on a stick: put the tops on their front on a sub, put the speaker stand in the pole mount and tilt it up. One person can do this without harming his back.
- My earlier mentioned IIR settings seem ok (for now). I did not encounter things I wanted to change (except for the lack of sub...)
Thanks!
Regards,
Peter vG.
BTW - how are every bodies boxes performing now you had had a chance to do a few shows on them ?
I use mine every chance I get. The 90's are fantastic for wider venues and easy to deploy in the manner Peter van Gills uses but the 60's are great 2 a side for venues requiring wider coverage.
I share many of PVG's observations on the sensitivity and responsiveness of the boxes.
I have an outdoor event coming up on 10/15 and am trying to decide which combo of tops to use, one 90 a side, two 60's a side or one 60 a side plus front fills. If anyone is interested, I'd be happy to post a site plan of the venue and see what you all think.
Hi Peter,
They are GREAT! Did a first gig with the DIYs with a band this weekend. My findings:
- The sound is flat, while the HF is crisp (but not too much).
- I had only one double 15" BR sub per side (small gig) and the low mid gain was 9dB lower than the subs (using the same amplification as with my old/previous tops). The BMS ran at -17dB... So, I have at least 9dB more headroom with the same amps.
- When mixing, these tops seem more "sensitive": 1 to 2 dB increase is sufficient to lift an instrument above/in the mix. Previously, I seemed to need 3-4 dB to do that.
- It is very easy to put voices and/or piano 'on top' of a mix and it sounds great.
- I heard things I didn't hear before during break music...
- Horizontal and vertical dispersion is very good: almost no coloration of the sound when walking through the venue. This saved me a lot of walks to 'calibrate' my ears (FOH was at the side, not in the middle of the venue).
- Sound is good at high SPL as well. Not like other 12" designs I know with x-over frequency >1kHz (SA C24, VRX932, ...)
- I forgot to check gain before feedback... I simply did not touch limit. I had 4 vocal mics on front and 1 vocalist with a soft voice. Not one beep nor near beep. I have the idea it could go a lot louder without any issue.
- I got compliments on the sound from both musicians and the crowd. Only after this I told them the tops are new and DIY...
- I still have to design new subs (I want a similar compromise as the tops: compact, quality sound and loud), but I already practiced the way to get the tops on a stick: put the tops on their front on a sub, put the speaker stand in the pole mount and tilt it up. One person can do this without harming his back.
- My earlier mentioned IIR settings seem ok (for now). I did not encounter things I wanted to change (except for the lack of sub...)
Thanks!
Regards,
Peter vG.
Hi Everyone,
Peter, this is exactly what I have found; you don’t have to push a voice or instrument to lift it above the mix to the same extent as you do with other systems, and the separation of the voices and instruments is better than anything I have used.
The gain before feedback is excellent and they go loud without harshness.
In my part of the world they are getting a reputation as being something special and engineers are actually looking to use them ….... almost rider spec :roll:
It’s great to see other people getting such good results
~~:smile:Cheers
Peter
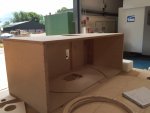
Hi Everyone. Sorry I am a bit late responding to your kind comments but I have been out of the country for a few days. Mark, The curve was made using thin ply laminated over a former using glue and clamps to hold it in place. The former was cut out from ply using the curve rebate from the CAD drawings. We cut a double length so we could provide two flares from one section by cutting them in half and then cutting the angles for connecting to the front baffle and the rear baffles. There is a 5mm rebate cut to locate the centre box sections which are made up of the two curves and the front and rear baffles. I think this is what you saw as an additional thin ply section inside the box. The foam curve sections were cut from the CAD drawing using a fairly hi tech CNC machine. The people cutting the wood and foam usually cut out complex foam sections and composite parts for the aerospace industry. This is a bit of an experiment and the back panel has rebates to accept the glued in foam sections. I built this one box to assess the best way to put it together and make any alterations to the drawings as necessary. I ended up assembling the whole box and fitting the rear panel last. i have not decided if this is the best approach. Any comments will be gratefully accepted. I have also fitted some sound deadening material to the inside of the curves and the back panels. the sort of stuff the auto industry use to stop resonances in metal panels. i have yet to ascertain if this will make any difference. We are planning to test the box in the near future and as soon as I have any results I will pot them here. Once i have ironed out the bugs in the drawings I will also make them available if anyone wants them as long as Peter is happy with this. I am no CAD expert so you may have to bear with me. As far as actually using the boxes, we are really pleased with the sound, very clear and excellent definition between instruments, small changes to system EQ are immediately recognisable and they remain clear and well defined as SPL increases. I think that some work needs to be done at the Sub/Mid Top crossover point but that is a small problem problem unique to our system. Using the Lake has made tuning the box fairly straightforward and I am hoping that when we get in the anechoic chamber that there will be some improvement over the first prototype which will make all the buggering about with the curve worth while:razz:. I include a couple of photos of the curve and rebate incase you are interested. Thanks to everyone for their kind comments, I can assure you that I am no carpentry guru and it has taken a great deal of time and many mistakes to get this far. Thanks to Peter for all his helpful suggestions.


Attachments
Very interesting construction Paul. Thx for sharing what you're doing. Looks great !!
Looking forward to hearing how the mid section tests out with all the curved pieces .
Also interested in your sound dampening. I've been trying trying some of that too. Nothing to say one way or another yet.
FWIW, I had to go to heavier handles, and really screw down my interchangeable baffles to nix resonances.The box can move a surprising amount of air for only going down to 100Hz.
@Peter, Don, Paul, et al,
Hope to measure harmonic distortion at various SPL's this week. Will post results....maybe folks with more experience can see ways to dampen whatever harmonics show up at high levels.
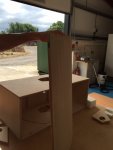
Finally ready for paint, measurements and dsp settings.
All comments and input and questions are very welcome.
The boxes are made with RCF 8Ohms, passive filter on the coax so two way active and the dsp settings for this setup is done with dbx driverack PA+.
There are 'only' 2 PEQ's for mid and 3 PEQ's available for high, plus a graphic EQ which is also heavily used. Still I think there's a long way to an acceptable response, but I must say that these boxes have potential.
Thank you Peter Morris for sharing :0) and thanks to all who have helped.
I will try FIR with rePhase or like on Powersoft later, and hopefully end up with a miniDSP balanced, ALLdsp or like.
The FIR solution is going to be tough for a beginner like me that still haven't managed to grasp the FIR theory :0)
I was hoping to find a tool that you could simply import the measurement, press start and voila haha... not.
Please also share your setups with dsp and amps. How are you driving these monsters? :0)
The first measurement is with delay (1.5ms) only. no EQ. The second was using a dbx driveRack PA+ with settings enclosed as PDF.
The sound from the DIY with the posted settings is far from my taste, - even when it's within +-3-4db there is something going on that makes some soundtracks sound far off, but I also learned with this box, that even the smallest eq can make a big difference.
Also I know many speakers today including my d&b are designed with a very specific frequency response to make it sound 'nice' even with recordings that are maybe not so nice to the ear.
I did measure my d&b boxes and tried to create the same response on the DIY but it again, the DIY boxes are exceptionally responsive to even the smallest changes in eq.
Attachments

Last edited:
Looks very similar to what i had to set on mine. Boost on 16k and also on 144hz and only a delay on Bms between 92-98mms. Also a small cut on 8.5 depending on venue..
Looks very similar to what i had to set on mine. Boost on 16k and also on 144hz and only a delay on Bms between 92-98mms. Also a small cut on 8.5 depending on venue..
Jason, May I ask with what equipment are you driving the DIY's?
DBX Venue 360
Powersoft Mq50 on BMS passive crossover
Camco Vortex 6 on B&C 12s
Powersoft Mq50 on BMS passive crossover
Camco Vortex 6 on B&C 12s
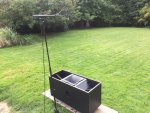
I am still working on tuning this monster, which is not easy :0)
The results so far is far from good.
Until now I have put the speaker flat on it's back in the middle of my lawn with the mike hanging 1 meter above the horn, dead center of the speaker just above the HF950 horn.
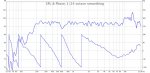
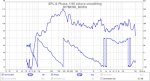
I have tried tuning both with a dbx Driverack PA+ using all 2+3 PEQ's , and the input EQ and also a Powersoft with dsp, using only about 5-6 PEQ's, so I know I can just keep on adding filters. See the enclosed screen shots from REW.
dbx:

Powersoft:

Both results are not sounding right. Way too much 3-400hz, even though the measurements claims differently and further up in the frequency range I get some strange response with certain records. What am I doing wrong? ~:-(~:sad:
When measuring the 12" horns alone still with the mike in the middle 1 meter above HF950 I get a steep roll of at 600hz?(Low pass turned off). When moving the mike to the side, just above one of the horn mouth's at about 30 cm I get a less steep roll off, but then some phase issues, making it difficult to use.
I think the d'apploito arrangement could call for a different approach when measuring? Is something going on that I don't know of? I know Peter Morris put them 4 meters up, - maybe that is the only way to get usefull data? And then how far from the mike?
I tried putting the mike out on 2, 4, and 8 meters, while the speaker standing upright on the ground and the mike at 50 cm. height and the results just kept getting more and more strange the further I got away, with a big whole in the mid frequencies. Very strange :roll:.
There's a lot to learn from this project, - let's start with having useful measurement data.
All help, input etc. will be very much appreciated.
The results so far is far from good.
Until now I have put the speaker flat on it's back in the middle of my lawn with the mike hanging 1 meter above the horn, dead center of the speaker just above the HF950 horn.
I have tried tuning both with a dbx Driverack PA+ using all 2+3 PEQ's , and the input EQ and also a Powersoft with dsp, using only about 5-6 PEQ's, so I know I can just keep on adding filters. See the enclosed screen shots from REW.
dbx:
Powersoft:
Both results are not sounding right. Way too much 3-400hz, even though the measurements claims differently and further up in the frequency range I get some strange response with certain records. What am I doing wrong?
~:-(~:sad:When measuring the 12" horns alone still with the mike in the middle 1 meter above HF950 I get a steep roll of at 600hz?(Low pass turned off). When moving the mike to the side, just above one of the horn mouth's at about 30 cm I get a less steep roll off, but then some phase issues, making it difficult to use.
I think the d'apploito arrangement could call for a different approach when measuring? Is something going on that I don't know of? I know Peter Morris put them 4 meters up, - maybe that is the only way to get usefull data? And then how far from the mike?
I tried putting the mike out on 2, 4, and 8 meters, while the speaker standing upright on the ground and the mike at 50 cm. height and the results just kept getting more and more strange the further I got away, with a big whole in the mid frequencies. Very strange :roll:.
There's a lot to learn from this project, - let's start with having useful measurement data.
All help, input etc. will be very much appreciated.