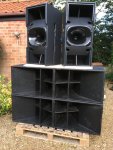
60 Degree DIY Mid Hi - AKA PM60

I’m using the following crossover points -
  • 100Hz 24dB LR IIR
  • 650Hz 24dB LR FIR for the 60 degree box and 700Hz for the 90 degree. Depending on how loud you need to go you can lower the crossover frequency a little - 600 & 650Hz respectively.
  • 6K3 brick wall FIR
The PEQ setting will depend on what drivers (RCF, B&C, 4594, 4594HE, with or without the passive crossover) you are using and the final box design. My box has the back corners cut off and I’m using a Lake LM26. I think I’m the only person to cut the corners off.

What drivers are you planning to use?

Hi Peter, You say 100Hz 24dB LR IIR...... In another thread you mentioned a trick using PEQ shaping plus a 12db xover to achieve a 24db xover. Is this what you've done above?

Sidenote: I still have not built my box's of your design yet but do have all the bits on the shelf waiting for me to get round to them in between everything else......

Hi Jim,

A 24 dB per octave Linkwitz–Riley filter is constructed by cascading two second order (12dB) Butterworth filters.

In this case there are two ways to achieve this; EQ the box flat for a reasonable (not too far) distance below the crossover frequency and then apply a standard 24dB LR, or use a 12 dB Butterworth and a little EQ until the end result matches perfectly a 24dB LR roll off.

In this case the natural roll off of the box plus a 12dB filter at about 100Hz gets very close. I think this is probably a better solution.

Thanks for raising this point :-)
 
Last edited:
Can some one point me to the current drawings for the 60 deg design, or send me a set of cad drawings please.
[email protected]
Peter did you get yours cut some where and put together yourself, or get a cabinet maker to do them?
Thanks
 
partsexpress seems to have in stock..

I am in New Zealand and brought those from partsexspress.... exactly the same price(incl freight to NZ) as the French company Peter mentioned. They took a while to arrive. I didn't look at the freight labels or anything but i got a feeling parts express didn't actually stock them themselves as other orders at the same time were much faster. I would suggest you give partsexpress a call to check it out prior to ordering if you need them this week.
 
Regarding horn mounting, it looks as though the plans are suggesting the XT1464 side mounting holes land right at the edge of the baffle/sidewall. Is there enough meat on the baffle at this area to prevent tear-out or have modifications to the box's width been made? Are you using threaded inserts here or using a different method?

Mark (and others who have built a removable/interchangeable horn/baffle system), if you are still willing to share those details (here or PM is fine. I can give you my email, if that's even easier), I'd love to learn as much info about it, as that is something I'm really looking forward to trying.

For those who have built most of the box (including sides) out of 15mm, where did you find the most benefit in bracing (aside from the standard top & bottom brace near the horn mouth and between the baffle exit and back of the enclosure? Im considering spacing two 13mm braces equally vs one 15mm down the middle. This would prevent cutting the bottom brace to clear the pole mount, but would that bracing be excessive?

I've been reading the mounds of valuable information in this thread from the sidelines for a while. And I can't thank you all enough for the wealth of knowledge you've shared. From design & flying ideas, to tuning, and next level hardware/software ideas and beyond. Thanks to those who have and continue to share — your willingness and selflessness don't go unnoticed. Cheers to you!

Justin
 
I found that the bracing as defined by Peter Morris is sufficient. I used 15mm birch ply. But, if you want to add more, you could add a brace across the horn mouth and/or from side to side within the volume of 12"-es. These areas give the lowest 'ploink' if you knock the cabinet. :-)

Note that the center of gravity is more to the back of the cabinet, so don't put the pole mount in the middle. (That could cause the cabinet pointing a bit upwards on a stick...) I determined the center of gravity after (almost) completing the cabinets.


Sent from my iPhone
 
Hi Peter van Gils,

Thanks! Those areas were right along with what I had in mind. As for the pole mount, I've got the adjustable versions to allow angling the box down -- I should probably mount them just forward of COG, but by how much is the question for now.

Hi Jason,

So, meaning you're using a full baffle then? Instead of having a top & bottom baffle piece, correct? What's the overall depth of your box (assuming you extended it a bit to clear the front of the horn)?

What methods are you all finding to successfully mount grills without resulting in any buzzing at high output levels? What grill material are you pleased with/finding easy to work with. I've only used the square hole grills from PE for subs so far.
 
Looking great, Josh! Did you end up going with a thirty-something degree splay like some on here are finding?
Did you go with 18mm ply for the whole box? Seeing you went wider, to accommodate a full baffle, what do each of your cabs weigh, after (what looks like) the grill cleats?
 
Looking great, Josh! Did you end up going with a thirty-something degree splay like some on here are finding?
Did you go with 18mm ply for the whole box? Seeing you went wider, to accommodate a full baffle, what do each of your cabs weigh, after (what looks like) the grill cleats?

Thanks...

I've gone for a 35 degree splay.

The whole box is 18mm and wider so is quite a bit heavier than the original, I haven't weighed them to see how much but I would guess around 45kg (thats a complete guess based on my old tops).

The edging is indeed to mount a grill.
 
Hi Jason,

So, meaning you're using a full baffle then? Instead of having a top & bottom baffle piece, correct? What's the overall depth of your box (assuming you extended it a bit to clear the front of the horn)?

What methods are you all finding to successfully mount grills without resulting in any buzzing at high output levels? What grill material are you pleased with/finding easy to work with. I've only used the square hole grills from PE for subs so far.

Full grill one piece. Just used a removable piece of ply where the horn meets to screw grill onto in the center. Normal grill nothing fancy with some audio foam behind it to match my subs..

PM60DIY.jpg
 
Last edited:
  • Like
Reactions: Leon JEDDi Lawrence
Regarding horn mounting, it looks as though the plans are suggesting the XT1464 side mounting holes land right at the edge of the baffle/sidewall. Is there enough meat on the baffle at this area to prevent tear-out or have modifications to the box's width been made? Are you using threaded inserts here or using a different method?

Mark (and others who have built a removable/interchangeable horn/baffle system), if you are still willing to share those details (here or PM is fine. I can give you my email, if that's even easier), I'd love to learn as much info about it, as that is something I'm really looking forward to trying.

For those who have built most of the box (including sides) out of 15mm, where did you find the most benefit in bracing (aside from the standard top & bottom brace near the horn mouth and between the baffle exit and back of the enclosure? Im considering spacing two 13mm braces equally vs one 15mm down the middle. This would prevent cutting the bottom brace to clear the pole mount, but would that bracing be excessive?

I've been reading the mounds of valuable information in this thread from the sidelines for a while. And I can't thank you all enough for the wealth of knowledge you've shared. From design & flying ideas, to tuning, and next level hardware/software ideas and beyond. Thanks to those who have and continue to share — your willingness and selflessness don't go unnoticed. Cheers to you!

Justin

Hi Justin, I'll fill you in what i did re interchangeable horns, but I have to say I wouldn't do it again. It took way too much nitty gritty engineering, and several tries getting pieces perfectly exact (each box has its parts that need to stay matched). And then final pain, was having gasketing that worked... the 12"s can really move some air. I think it wouldn't be that much harder to just build more boxes....
If you still want to give it a go, lemme know and I'll post some picts....

FWIW, re box width, I like it just wide enough to let the XT1464 sit completely inside the walls...for the reasons you asked about.
I used 15mm for sides and no additional bracing beyond Peter/Don's plan. Your two 13mm would solve the pole mount, huh..
 
I'm looking to build a system with 2 - DIY 90 and 4 Keystone subs for live bands. I'm not capable of testing and tuning the system myself at this time. I've read through the whole thread a couple times, and it seems like it shouldn't be too hard to put together a great sounding rig for larger venues and small festival gigs.

I just messaged Max about a couple of flat packs. If that doesn't work, I have a local cabinet maker that will cut everything for me for the DIYs and Keystones. I plan on using 8 ohm 12s and tri amping the DIYs with an NU4-6000 on each cabinet using a DCX2496 for DSP. I can run the Keystones 2 per NU4-6000 as well. 2 DIYs and 4 Keystones with 1 DCX2496 (mono) and 4 NU4-6000.

I have been thinking of going with an all powered Turbosound iQ rig, but it wouldn't be anywhere close to the performance of this rig if I could get it tuned properly.

So am I crazy?

Should I go mini DSP and get files from someone?

Would I be better off using the passive crossover on the HF/VHF and running it off the other 2 channels (bridged) of the NU4-6000?

Thoughts?

Thanks for your time gentlemen,

David