60 Degree DIY Mid Hi - AKA PM60

Hello all!

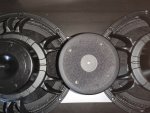
It took me a day to read this complete post! Great job to you all! Just to inform you guys i have just ordered before Covid-19 the B&C 12NLD76 with the idear they must be the mid drivers for my new cabinet. The cabinet design was not made yet but the idear was just make a point source with front loaded units. Till today!
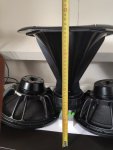
After reading the complete post now i will build my ow set of PM60 or PM90. The horn for the PM90 is at the moment in holland difficult to get. So probalby it will be the PM60 and this can be chanched afterwards to PM90.

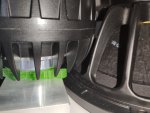
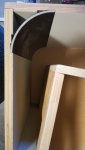
I am for sure going to use the DCX464. I just love B&C speakers. They do what they promis till today for me. Only thing after reading the complete post is will they really fit? As i saw in a post Peter just put them loose in the box? Did you really build them in?

The only difference in the complete build will be the amp in the cabinet. Yes i know the weight. I have 2 Pascal x-pro-2 units with OEM dsp with FIR and a lot of other nice functions as lake also supports. I dont know if it will fit but i am going to try it. As base i will use the DWG drawing to check if it is possibol.

Maybe nice to know. the subs i have already are 2x SB18 a side. So crossing will be between 90 and 100hz from there.
 
  • Like
Reactions: Trev Mcd
Hi Jan,
Glad to hear you're planning taking on the build. I have not been disappointed in either the 60's or 90's I have built. Peter has done a masterful job with the design.

As far as installing plate amps, there is no room in the cabinets as they are designed. You'll need to make them larger to accommodate the amps. One of Peter's main design criteria was for them to be pole mountable. They are pretty much at the limit right now. Any larger/heavier and I'm not sure they will be.

Good luck and best on the build!
 
Hi Don,

Thank you for your reply. Your right. I had a look in the cabinet by dwg but as it is now there is no way to get a plate amp in. I must honestly say that i probably will use it also pole mounted. so maybe i have to chance my idear.

But do you know about the driver? will it fit in the latets CAD file? i have my doubts.......
 
Peter could probably comment on whether or not they fit as far as actually putting them in the cabinet goes.

As far as the drawing, the purple rectangle shown here is the bounding box for the DCX464. It will most definitely fit within the available space. Please note that this requires the rotation of the 12NDL76 to be such that one of the gaps between the arms of the basket to be towards the center of the cabinet. This was pretty much required previously anyway, but it's worth noting here.

1594654345559.png
 
Peter could probably comment on whether or not they fit as far as actually putting them in the cabinet goes.

As far as the drawing, the purple rectangle shown here is the bounding box for the DCX464. It will most definitely fit within the available space. Please note that this requires the rotation of the 12NDL76 to be such that one of the gaps between the arms of the basket to be towards the center of the cabinet. This was pretty much required previously anyway, but it's worth noting here.

View attachment 209254


Thank you Max for the detail! This is very clear! I have only one question. Is this the RCF horn or the 18sound horn? I have here your dwg drawing opened and as far i see this looks like the RCF horn

1594670741870.png

Accouding the measurement in your drawing the horn has a depth of 208mm inside.

accourding the 18sound specs the horn has a depth of 243 mm inside.


1594670654610.png
 
Thank you Max for the detail! This is very clear! I have only one question. Is this the RCF horn or the 18sound horn? I have here your dwg drawing opened and as far i see this looks like the RCF horn

You're totally right! It still fits, but it's tighter than I thought it was.

Ok. How far is the DCX driver from the 12” membrane? The xmax/xmech of these drivers is quite large...

The bounding box has a clearance of about 1 cm, but the actual clearance will be greater due to the shape of the DCX heatsink. I'm at the beach so I don't have the tools on hand to model it exactly. The xvar is only 6.5 mm. While it is possible to have higher excursions, the 12" baffle is only capable of supporting 1 cm of excursion. Therefore, I think there should be no issues.
 
Today i have recieved the model of the DCX646. I am waiting from 18sound to receive the model for the XT1464. When i have this info i will make a new drawing for the 60 degrees horn.

This is with the 90 deg horn and the BC dcx464 driver. As you can see it will be very close....

1594799109788.png
 
Today received the model of the XT1464. If i just put it in place same position as the BMS driver this is te result:

1595338310442.png

@Peter Morris , i saw you can lower the DCX464 mutch lower into the speakers in the PM90 post picture. Tomorrow the driver will arrive and i can make a model from wood to see how far the driver can be lowered and still safe distance of the 12 inch cones. From my point of vieuw it would be nicer not to use a spacer in the cabinets but adapt the cabinet to the horn. What is the rule i have to follow when i want to make the cut out fot the horn at the fron smaller? (30mm from front to 10mm for example)


1595338694486.png

Almost complete ;)
 
  • Like
Reactions: Peter van Gils
Today received the new driver and checked if there is enough clearance. In the original drawing of the PM90 the horn must move about 6mm to the front same as Peter mentioned in the PM90 post. My first idear was not to chanche the cabinet dimension and moving the horn a little to the front. I sended Peter van Gils the pictures i made and his suggestion was to extend the clearance between the woofers. I must say this would be the best solution. Below the pictures and the addapted drawing. To get enough clearence the woofers are moved 10mm extra. This will be for me now the basics starting point. The clearence between eacht nearest point to the woofers is about 5mm. (the woofers are in the correct angle on the pictures i made)


1595418738273.png


1595418756260.png
 

Attachments

  • 1595418442497.jpg
    1595418442497.jpg
    4.8 MB · Views: 107
  • 1595418442433.jpg
    1595418442433.jpg
    6.2 MB · Views: 112
  • 1595418442384.jpg
    1595418442384.jpg
    1.5 MB · Views: 118
  • 1595418442336.jpg
    1595418442336.jpg
    1.4 MB · Views: 115
  • 1595418442289.jpg
    1595418442289.jpg
    1.4 MB · Views: 100
Sorry not to have responded.

To be entirely honest, I would just use a 1" thick piece of ply for the front horn baffle for the XT1464, but I'm mostly just being lazy.
 
Few pictures. I'm going to use the convair crossover filter.

That looks really slick!

I especially like the routing you did to fit the quarter pipe flush with the walls - it's what I would probably have done. Did you ever end up filling the empty space behind the quarter pipe? Way back when in the early days of this project, it was well established that it should be filled to prevent it being a resonating cavity, but if it's sealed and the pipe is stiff enough I don't see it being a problem.
 
Max,
For the large radius, the quarter pipe has a thickness of 3.5 mm This is sufficiently stiff. Because of the routing it is stuck by itself. however, due to the use of polymer sealant, everything is glued and airtight. What now remains to be done is the grill, warnex paint and wiring.
After that comes the hard part. Making processor settings. As said initially the vhf passive using a Convair crossover. maybe later when I build 2 more I will switch to 3 way active. For the time being, problems with gluing the speaker foam to the grille. it does not stick enough. Thank you for your response. As soon as they are ready I will post some photos
 
I think I would want to fill it with expanding polyurethane foam - it's a 10-second job and can surely do no harm!

I filled them up with PU foam. Took just over 10 seconds, but worth te trouble. And as promised pictures of the finished speakers. including the amplifier.
 

Attachments

  • 20200830_200717.jpg
    20200830_200717.jpg
    1.8 MB · Views: 158
  • 20200830_200124.jpg
    20200830_200124.jpg
    1.8 MB · Views: 157
  • 20200830_200213.jpg
    20200830_200213.jpg
    1.5 MB · Views: 152